When it comes to torrenting, privacy should be a top priority. And the Vuze client offers a unique feature that lets you bind it to a VPN, and only download or upload when there is an active VPN connection.
Using any torrent client, including Vuze, without configuring privacy services lets anyone see your home IP address. Rather than allow yourself to be easily identified, it’s always preferable to have the extra security of a VPN binding.
Why Bind a VPN to Vuze?
Why not simply turn your VPN on and then torrent? Like any server, a VPN can temporarily go down. Ordinarily, the torrent would continue running, exposing your home IP address.
However, if you bind the VPN to Vuze, the torrent will automatically stop if the VPN connection is interrupted. It works the same way as a kill switch. In effect, it’s a guarantee of privacy.
Setting Up
First, ensure that you’re connected to your VPN service. You can double-check this simply by Googling “what is my IP?”.
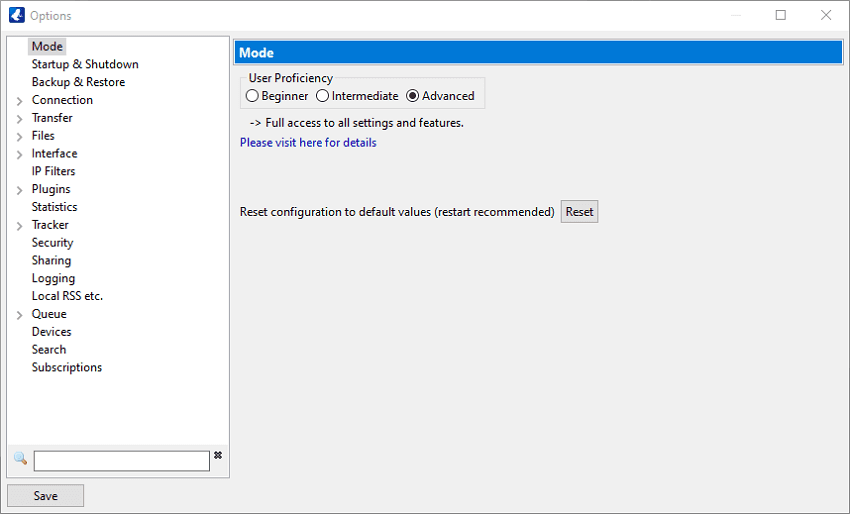
Because we’ll be dealing with more advanced networking functionality, you’ll need to have Vuze in “Advanced” mode for user proficiency level. If it’s not, just navigate to Tools -> Options. You should see a popup window with categories in the left pane. Click on “Mode“.

The right side of the window should now have the three user proficiency levels. Make sure “Advanced” is selected, and then click “Save”.
Inserting your VPN’s Information
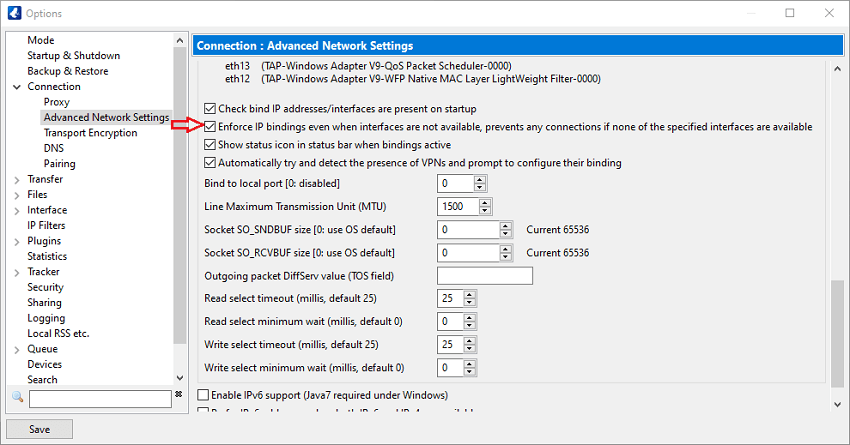
In the same “Options” window, there is an expandable menu item in the left-hand pane called “Connection”. Expand that, and then select the sub-item “Advanced Network Settings“.
You’ll see an empty text field that has the label “Bind to local IP address or interface“. For context, every VPN creates a Network Adapter, or “interface”, upon client installation. Other applications may install additional interfaces, which is why the list of Network Adapters you’ll see on this screen may vary in size.
Once you find the Network Adapter used by your VPN, type in the “alias” for it into the “Bind to local IP address or interface” text field. This is the item in the left-most column of the table.

As you can see in the example above, the VPN we are using for this demonstration is ExpressVPN. Therefore, the correct alias for the Network Adapter is “eth10“. Remember that it will very likely be a different one for you.
Most times, VPN providers will insert their names into Network Adapters that they install. If you’ve gone through the list carefully and still can’t find an interface with your VPN service’s name, visit their Knowledge Base or contact the company to ask.
Finishing Up the Bind
After you’ve inserted the alias for your VPN’s interface, there’s one very important step left in this window. Right below the table of Network Adapters, there are some checkbox options.
The second option beginning with the text “Enforce IP bindings even when interfaces are not available” must be checked. If you don’t check this box off, that means you’re saying that you’d prefer to use your VPN. Left unchecked, that means that if your VPN goes down, your IP address will be left exposed.

All that’s left to do in this window is click “Save“. You can now close the options window, but leave the program on.
Testing the Bind
Before calling it quits, you’ll need to make sure that the settings we configured earlier are correct and being enforced.
First, take a look at the bottom bar of the main Vuze BitTorrent client. On the right-hand side, there should be what looks like an upside-down “T” with the word “Routing” next to it. After making sure once again that your VPN client is connected, make sure that “T” is green. If it’s red, that means Vuze cannot connect to the Internet, and it’s likely that the wrong interface was selected.


After making sure your “T” is green, find a public domain torrent file. Start a download of it, and as it’s downloading, disconnect from your VPN client. If Vuze stops downloading and the routing “T” becomes red, it means the binding worked.
Also, in your list of torrents, the entry under the “Down Speed” column should become blank.
Connect using your VPN client once again, and the download should resume.
Double-checking the Bind
If you’re a risk-averse person, there is an alternative way to test the VPN bind. The method above assumes that the client your VPN uses is accurately reflecting your network status. There have been cases where VPN clients have said they are connected when they are not, and vice-versa. You will need to be logged in as an Administrator.
First, make sure your VPN client states that it’s connected. Grab another public domain torrent and add it to the queue. This time, we are going to manually turn off the Network Adapter your VPN uses. In Windows, this means opening the Control Panel, clicking the “Network and Internet” category, and then clicking “Network and Sharing Center“. Hit the “Change adapter settings” link on the left-hand side, and you should see the list.
After starting the torrent, right-click the VPN’s Network Adapter, and then click “Disable“. Once again, the routing “T” should become red, and the “Down Speed” column should be blank. Right-click again to re-enable it, and you should be set!
Conclusion
Although the binding and testing processes may feel like a pain, it’s a one-time deal to ensure privacy for years to come. Remember, there are only a few key components to doing so.
After figuring out which Network Adapter corresponds to your VPN service, enter the alias for it into Vuze. Ensure you select the option to force Vuze to use it. After that, you will need to test it simply by running a torrent with the VPN connected and then disconnecting. Remember, you also have a more advanced testing option for extra confidence.
If you switch VPN providers or your VPN provider issues an update, you may need to reconfigure these settings. Have fun torrenting anonymously, and stay safe!


