If qBitTorrent client is not set up correctly, it can reveal your real IP address. What is most alarming about this is that it may occur even if you use a good VPN. This can have serious consequences, as it exposes your torrent activity.
This guide will discuss the qBitTorrent settings responsible for exposing the user’s IP. Finally, we will analyze the steps you can take to properly configure it for torrenting without leaks.
How Can qBitTorrent Leak Your Real IP?
The thing to remember is that VPNs create additional network connections on your device. Sometimes, the same VPN creates several connections, one for each protocol.
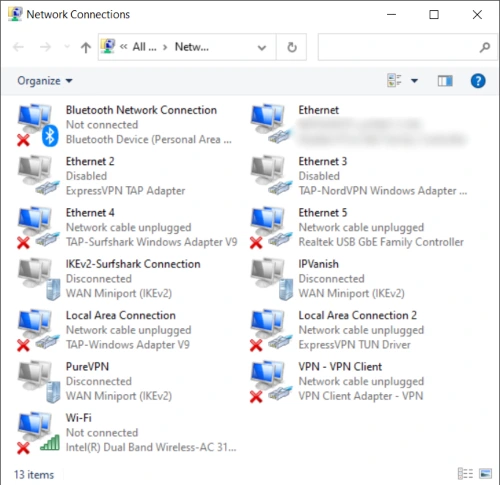
Just look at the network connections of the device I am using; as you can see, I have a few VPNs installed at the moment (for testing reasons). And this is not even the highest I have seen.

Unfortunately, qBitTorrent does not detect the network interface the VPN is using. You may need to bind qBitTorrent with the matching VPN network. That means the BitTorrent client will only use the VPN to download the torrent.
If you don’t do this, the wrong network interface can leak your IP, as shown in the screenshot below.

As you can see, qBitTorrent is still using the VPN’s IP (bottom IP), but my true IP is also exposed (top IP).
How to Properly Bind qBitTorrent to a VPN
These are the steps to configure qBitTorrent and force it to use the VPN to make sure it does not leak your IP.
- Find out if there is a leak
Before changing any options, you make sure which IP qBitTorrent is using. Have a look at our guide on how to check the torrent IP to learn how to do it properly.
If there are no leaks, you are using a VPN that works well with the default option “any interface”. In this case, there is no need to change anything. If there is a leak, continue implementing these steps. - Go to “Open Network & Internet Settings”
Right-click on the Internet access icon on the system tray and select “Open Network & Internet Settings”.

- Click on “Change adapter options”
Almost at the end of the screen, in the “Advanced network settings”, select the option “Change adapter options”.

- Identify the adapter your VPN is using
Keep in mind that you are not going to make any changes here. You only have to identify the correct adapter. For example, let’s say I am using Surfshark VPN. As you can verify on the screenshot of my network connections I showed you before, I would have to remember that this VPN is using the “Ethernet 4” adapter on my device.
- Head back to qBitTorrent to make the necessary changes
In qBitTorrent, go to “Options” > “Advanced”. The option you are looking for is called “Network interface”. There, you will have to select the adapter you previously identified. Continuing with the previous example, in my case, I would have to choose the option “Ethernet 4”.

Note: Remember that these steps only concern a specific VPN. This is not a universal fix. Since each VPN uses a different network adapter, you must make this change every time you change VPNs.
Configuring qBitTorrent Isn’t Always Needed
From experience, I didn’t need to make any changes when using some VPNs. That’s because they worked out of the box with the default option, “any interface”.
Unfortunately, that does not happen most of the times, and you must select the correct network adapter for most VPNs.
If you want a VPN that works out of the box with the default option, I recommend getting a NordVPN subscription. I still recommend testing it first. My point is that every time I use it, there was no need to change any options.
Conclusion
One could argue that the easiest thing to do would be finding an alternative BitTorrent client and avoid the configuration mentioned in this tutorial.
But the truth is that qBitTorrent has many faithful followers. If, like me, you are one of them, make sure you test everything and make all the changes needed to take advantage of the protection of your VPN.


